The Sage People Recruit Configure page includes settings controlling how your Recruit implementation works. The page is broken down into a number of tabs:
- Overall options
- Hiring Manager
- New Vacancies
- Job Boards
- Broadbean
- Agency Portal
- Candidate Portal (Applicant Portal)
The Candidate Portal configuration tab uses the alternative name Applicant Portal.
- External APIs
- Vacancy Sharing
To view the Recruit Configure page:
-
Go to Setup and in Quick Find enter Installed Packages.
-
For the Sage People Recruit package, select Configure:

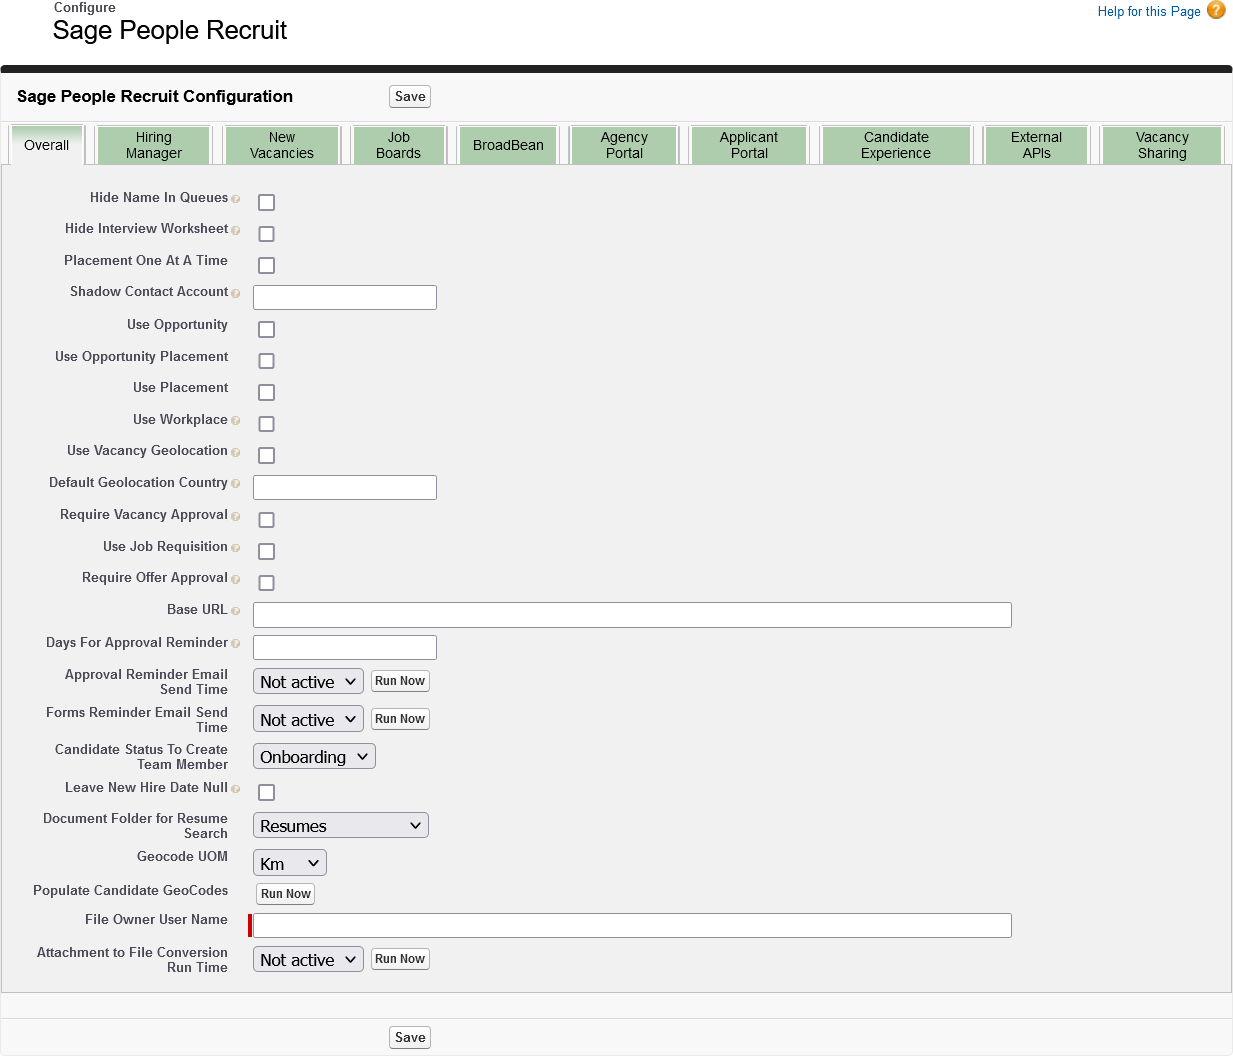
Overall
To configure Recruit Overall options:
-
Go to Setup and in Quick Find enter Installed Packages.
-
Find Recruit in your list of installed packages and select Configure in the Action column.
-
On the Recruit Configure page select the Overall tab:
-
Complete the fields as follows:
Field
What to enter
Hide Name in Queues
Checkbox. If checked, application numbers are used in place of candidate's names in Assessment Queues. This helps to anonymize the assessment process.
Hide Interview Worksheet Checkbox. If checked, hides the Interview Worksheet button on the selection stage and the Interview Worksheet link in WX. Placement One At A Time
Checkbox.
Not supported.
Shadow Contact Account
Text. The name of the Account you are using to host Contact email details for Candidates.
Use Opportunity
Checkbox.
Not supported.
Use Opportunity Placement
Checkbox.
Not supported.
Use Placement
Checkbox.
Not supported.
Use Workplace
Checkbox. If checked:
- Vacancies and applications can be linked to defined Workplaces.
- Selection stages have the Show To Workplace and Is Workplace Stage options enabled.
- Applications have the Show To Workplace option enabled.
Use Vacancy Geolocation
Checkbox. If checked, Recruit uses a geolocation service to locate vacancies by postal or zip code, or by placename. Locations can then be indicated by map.
Be aware that the geolocation service is primarily for mapping and is highly accurate when valid country and postal code values are supplied. Location Region and Location City values returned by the service are likely to need modification and can be manually overridden.
Default Geolocation Country
Text. The country to use by default for geolocation if it cannot be determined by the geolocation service.
Require Vacancy Approval
Checkbox. If checked, vacancies must follow an approval process before they can be advertised. Approval is indicated by a completed Approval Date field.
Use Job Requisition
Checkbox. If checked, an abbreviated form of the vacancy can be used as a job requisition before the full vacancy is approved. Typically used in conjunction with Require Vacancy Approval.
Require Offer Approval
Checkbox. If checked, applications must be approved before an offer can be made. Approval is indicated by a completed Approval Date field.
Base URL
URL.The URL used as the prefix for links providing external access to your Recruit system. In most cases this is the URL configured for your organization by Sage People.
The base URL typically looks like:
https://xxxxxxx.my.salesforce-sites.com/recruit/where xxxxxxx is the sub domain you set in Sites.
The Base URL is used by Recruit Candidate Portals, in emails and templates.
Days For Approval Reminder
Number of days. The length of time allowed to elapse before a reminder email is sent to the approver of a Pending Vacancy. Use in conjunction with Reminder Email Send Time.
Reminder Email Send Time
Picklist. The time of day the Approval Reminder email batch is sent. Use in conjunction with Days for Approval Reminder.
Candidate Status to Create Team Member
Picklist. For implementations also using Sage People HCM, the status that an candidate must reach before an HCM Team Member is created using details from the Recruit Candidate Record.
Leave New Hire Date Null
Checkbox. If checked, when creating a Team Member record at the conclusion of the Recruit process, the start date is not set to todays date by default, but left blank for manual entry.
Document Folder for Resume Search
Picklist. The folder location for resumes. You must specify a folder location if you want Text search to include Resumes when searching for candidates. If you do not want Text search to include Resumes, select -none- from the picklist.
If you are using the Resume Parsing service you do not need to specify a document folder to permit text searches across parsed resumes; you can use the text search feature in Candidate Search. If you are using the Resume Parsing service, set Document Folder for Resume Search to -none-
Geocode UOM
Picklist. The unit of measurement (UOM) to use as the default when specifying a location as a criteria in Candidate Search.
Select the picklist and choose Km or Miles.
The default value can be overridden for individual Candidate Searches.
Populate Candidate GeoCodes
Run Now button. Use to generate GeoCode data for existing Candidate Records entered before GeoCode based location functionality was introduced. GeoCodes are used to establish candidate location for Candidate Search.
Candidates must have valid Country and Post Code values.
GeoCodes are automatically generated for new candidates and when entering new, valid, country and post code values for an existing candidate.
File Owner User Name Displayed when Send Resumes As links is selected. Enter the email address of the Sage People user record designated as the file owner for all Resume files.
Attachment to File Conversion Run Time Picklist and Run Now button. Enables you to trigger a batch to convert existing attachments associated with Recruit objects to Salesforce files. In most cases the batch will have been run automatically during the package upgrade process. If you plan to run the batch manually, refer to Converting attachments to files. - Select Save.
Hiring Manager
To configure Hiring Manager:
-
Go to Setup and in Quick Find enter Installed Packages.
-
Find Recruit in your list of installed packages and select Configure in the Action column.
-
Select the Hiring Manager tab:

-
Complete the fields as follows:
Field What to enter Hiring Manager Show All Applications Checkbox. If checked, the Hiring Manager sees all stages for all Applications and Vacancies where they are the Hiring Manager.
To limit access to specific stages, leave unchecked and use the Show To Hiring Manager setting when defining a Selection Stage for a Vacancy, to show all Applications reaching that stage and all following stages.
Hiring Manager Assess All Stages Checkbox. If checked the Hiring Manager can act as an assessor for all selection stages for all Vacancies where they are the Hiring Manager.
To limit access to specific stages, leave unchecked and use the Is Hiring Manager Stage setting when defining a Selection Stage for a Vacancy. Is Hiring Manager Stage designates that stage as one which must be assessed by the Hiring Manager.
Hiring Manager Control Checkbox. If checked, Assign Interviewer and Email Resume buttons are available to the Hiring Manager in WX.
Hiring Manager Assessment Has Outcome Checkbox. If checked the Hiring Manager assessment form has picklists for Outcome and Next Stage, enabling the Hiring Manager to control the course of Applications.
Hiring Manager Move to Next Stage Checkbox. Displayed when Hiring Manager Assessment Has Outcome is selected. If checked, when Hiring Manager selects the outcome for the Assessment, the Application is moved to the selected stage. If not checked, the Recruiter is alerted of the Assessment outcome and can move it to the next stage.
-
Select Save.
Using Hiring Manager in WX requires some additional configuration.
New Vacancies
You can set options controlling the way New Vacancies can be created:
- Enforce the use of templates for all new vacancies.
Templates help to ensure consistency throughout the talent acquisition process and can include a detailed definition of recruitment stages for Vacancies.
-
Enable the display of templates and selected vacancies on the New Vacancy page to act as starting points for new vacancies. Choose from:
- Templates
- All Vacancies
- Your Vacancies
To configure the New Vacancy process:
-
Go to Setup and in Quick Find enter Installed Packages.
-
Find Recruit in your list of installed packages and select Configure in the Action column.
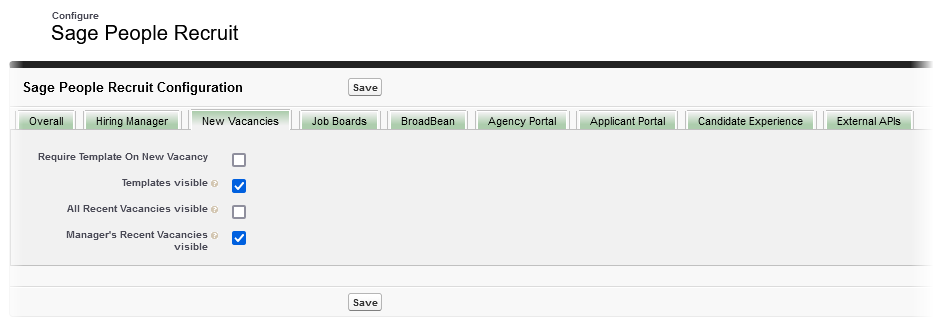
- Select the New Vacancies tab:
-
Complete the fields as follows:
Field
What to enter
Require Template On New Vacancy
Checkbox. If checked new vacancies must specify an existing vacancy to act as a template for Selection Criteria and Stages - you cannot save a new vacancy that is not based on a template. If checked, you must also check Templates Visible so that templates are available for selection.
If checked, you can use vacancy templates to help create a more consistent recruitment process and to make it easier to create new vacancies.
If not checked, new vacancies can be created without basing them on templates.
Templates visible
Checkbox. If checked, Vacancy Templates are listed for selection in the Copy Criteria and Stages From section on the New Vacancy page.
Must be checked if Require Template On New Vacancy is checked to make Templates available for selection.
All Recent Vacancies Visible
Checkbox. If checked, a maximum of the 997 most recently created Vacancies are listed for selection in the Copy Criteria and Stages From section on the New Vacancy page.
Manager's Recent Vacancies visible
Checkbox. If checked, a maximum of the 997 most recent Vacancies created by the hiring manager are listed for selection in the Copy Criteria and Stages From section.
- Select Save.
Job Boards
Not currently supported. Aggregated job board access is available through Broadbean.
Broadbean
When you first deploy a version of Sage People Recruit supporting Broadbean integration you are asked to approve Broadbean access:
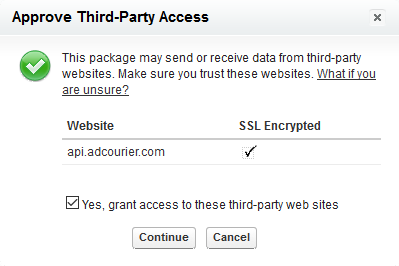
Make sure that the website address matches the expected Broadbean value, then check Yes, grant access... and select Continue. Sage People continues with Sage People Recruit installation.
When installation is complete, to configure Broadbean:
-
Go to Setup and in Quick Find enter Installed Packages.
-
Find Recruit in your list of installed packages and select Configure in the Action column.
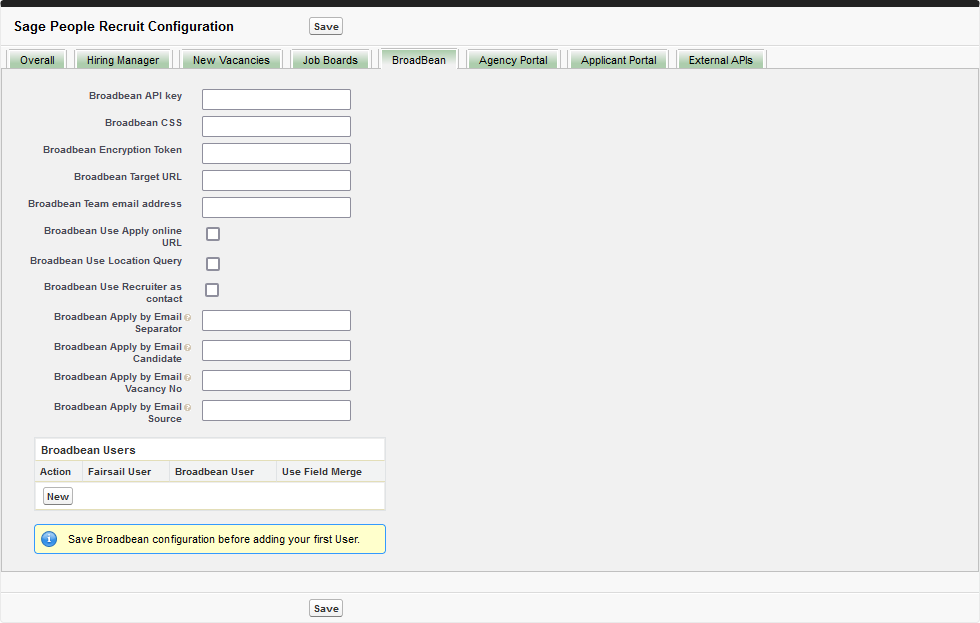
- Select the Broadbean tab:
Your contract with Broadbean defines one of two integration services:
Apply Online
All applications through the job board are redirected to a specified Sage People Candidate Portal.
Apply by email
All applications through the job board generate an email application, routed to a Sage People email service.
The Broadbean tab includes fields for both methods; you must complete one set or the other, not both.
-
Complete the fields as follows:
Field
What to enter
Broadbean API key
A unique API key supplied by Broadbean to enable connection through Sage People to the Broadbean site. The key is provided through Sage People and is unlikely to change.
Broadbean CSS
The link to the style sheet used to render your view of Broadbean pages. You can use the standard Broadbean css, or more typically, supply one specific to your organization.
Broadbean Encryption Token
The unique value supplied by Broadbean to enable secure connection to the Broadbean site.
Broadbean Target URL
The URL supplied by Broadbean for the Broadbean site used by your organization. The Target URL is unlikely to change.
When upgrading for the first time to a version of Sage People Recruit supporting Broadbean, you are asked to approve access to this site.
Broadbean Team email address
The single email address you want Broadbean to use as the target for all responses to vacancies posted by Broadbean.
If you want responses to be sent to individual recruiters leave blank and check Broadbean Use Recruiter as contact.
If you provide a Broadbean Team email address and check Broadbean Use Recruiter as contact, the team email address overrides the recruiter details.
Broadbean Use Apply online URL
Checkbox. Check this box only if your Broadbean account is set up to use the Apply Online method.
If checked, applications to the Vacancies posted to Broadbean are redirected to a Candidate Portal defined for your org. Check to link the vacancy to your Candidate Portal.
Leave unchecked if your Broadbean account is set up to use the Apply Online method; candidates then apply by email, using the response address hosted by Broadbean.
Broadbean Use Location Query
Checkbox.
If checked, Broadbean retrieves the location specified in the Vacancy Location field and uses that value. The location must be a value recognized by Broadbean as a "City" value. You are given the option to change the City location selected for each Broadbean advertised vacancy. City must be accurately specified to enable Broadbean posting.
Check.
Broadbean Use Recruiter as contact
Checkbox. An alternative to Broadbean Team email address.
If checked, Broadbean retrieves recruiter details using the Vacancy Recruiter field and sends vacancy responses to the recruiter.
If you provide a Broadbean Team email address and check Broadbean Use Recruiter as contact, the team email address overrides the recruiter details.
Fields to be completed if your Broadbean account is set up to use the Apply by email method
More information on setting up support for Broadbean Apply by email
Broadbean Apply by Email Separator
A RegEx (Regular Expression) used to control the separation of the subject lines of emailed responses to Broadbean posted vacancies. The separator enables Broadbean to identify the different elements included in the subject line such as the Vacancy Number or candidate email address. Elements are allocated sequence numbers specified in Broadbean Apply by Email Candidate, Broadbean Apply by Email Vacancy No and Broadbean Apply by Email Source.
Enter:
[\\/\\:]
to specify a forward slash (/)
Sequence numbers start at 0 for the first element.
Broadbean Apply by Email Candidate
The sequence number of the element representing the candidate email address in the subject lines of emailed responses to Broadbean posted vacancies.
For example, enter:
2
to conclude the subject line of the email with the candidate's email address
Broadbean Apply by Email Vacancy No
The sequence number of the element representing the Vacancy Number in the subject lines of emailed responses to Broadbean posted vacancies.
For example, enter:
0
to start the subject line of the email with the Vacancy Number.
Broadbean Apply by Email Source
The sequence number of the element representing the source system's label name in the subject lines of emailed responses to Broadbean posted vacancies.
For example, enter:
1
to place the source of the application as the second element in the email subject line.
-
Select Save
Sage People saves your Broadbean configuration details and displays the Home page for your org.
-
Return to the Recruit Configure page and reselect the Broadbean tab.
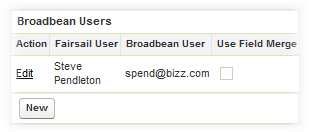
Scroll to the Broadbean Users section.
Broadbean Users
Do not attempt to add your first Broadbean user before saving the Broadbean Configure page - doing so clears the details you have entered.
Action Access to Broadbean options is granted to permissioned users who are registered with Broadbean. Use this section of the Broadbean Configuration page to map registered Broadbean users to Sage People Users. Fairsail User Broadbean User Use Field Merge - In Action column select New.
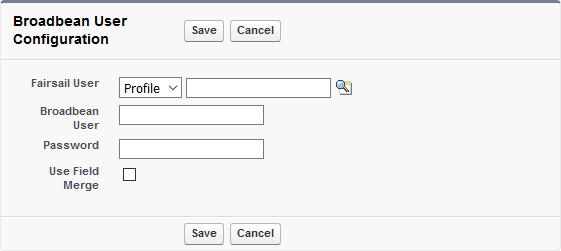
Sage People displays the Broadbean User Configuration page:
-
Complete the fields as follows:
Field
What to enter
Fairsail User
From the picklist select one of:
-
Profile
Not currently supported.
-
User
To assign the Broadbean User to a defined user. You can repeat the process to assign the Broadbean User to multiple defined users.
Then select Location Lookup
 to find and select the Profile or User you want.
Broadbean User
The user name as registered with Broadbean.
Password
A unique password for this user.
Use Field Merge
Checkbox.
Leave unchecked.
-
-
Select Save.
-
Select Save on the Sage People Recruit Configuration page to close the page and return to the home page for your org.
Agency Portal
You must configure the Agency Portal before first use.
To configure the Agency Portal:
-
Go to Setup and in Quick Find enter Installed Packages.
-
Find Recruit in your list of installed packages and select Configure in the Action column.
-
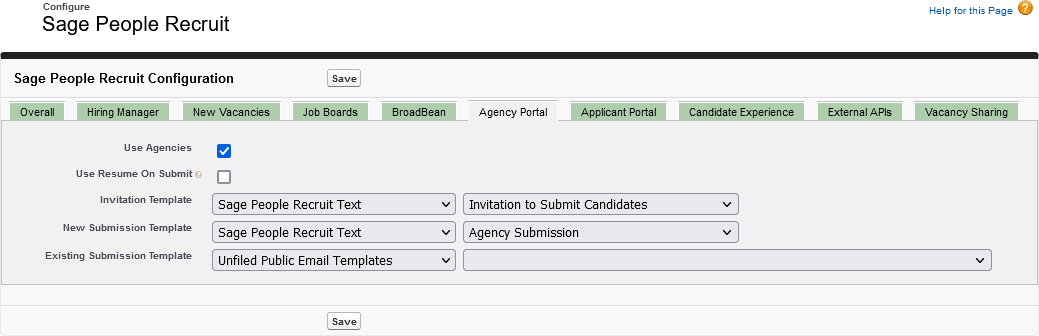
Select the Agency Portal tab:
-
Complete the fields as follows:
Field
What to enter
Use Agencies
Checkbox. Check to enable the Recruit Agency Portal.
Use Resume On Submit
Checkbox. Check to enable agencies to submit resumes when submitting candidate details.
If checked, the Agency Portal displays the Attach Resume field with an associated Browse button:

Invitation Template
Picklist. An email template used to invite an agency to submit candidates for a vacancy.
Select the picklist and choose Invitation to Submit Candidates.
To edit the template, go to Setup > Email > My Templates.
The Invitation to Submit Candidates template is managed, so you can edit only certain attributes.
New Submission Template
Picklist. An email template used to confirm to an Agency receipt of a new submission from them.
Select the picklist and choose Agency Submission.
To edit the template, go to Setup > Email > My Templates.
Existing Submission Template
Picklist. An email template used to reject a duplicate submission. This template enables you to formalize the rejection message displayed on the Portal when a candidate's details are received for a second (or subsequent) time. The email is sent to the agency.
This template is not supplied by default.
- Select Save.
Candidate Portal (Applicant Portal)
When Sites and access setup is complete, configure the default settings for Candidate Portals before first use. Defaults for email templates can be overridden in the settings for specific Candidate Portals, enabling you to customize responses to the portal.
To configure defaults for Candidate Portals:
-
Go to Setup and in Quick Find enter Installed Packages.
-
Find Recruit in your list of installed packages and select Configure in the Action column.
-
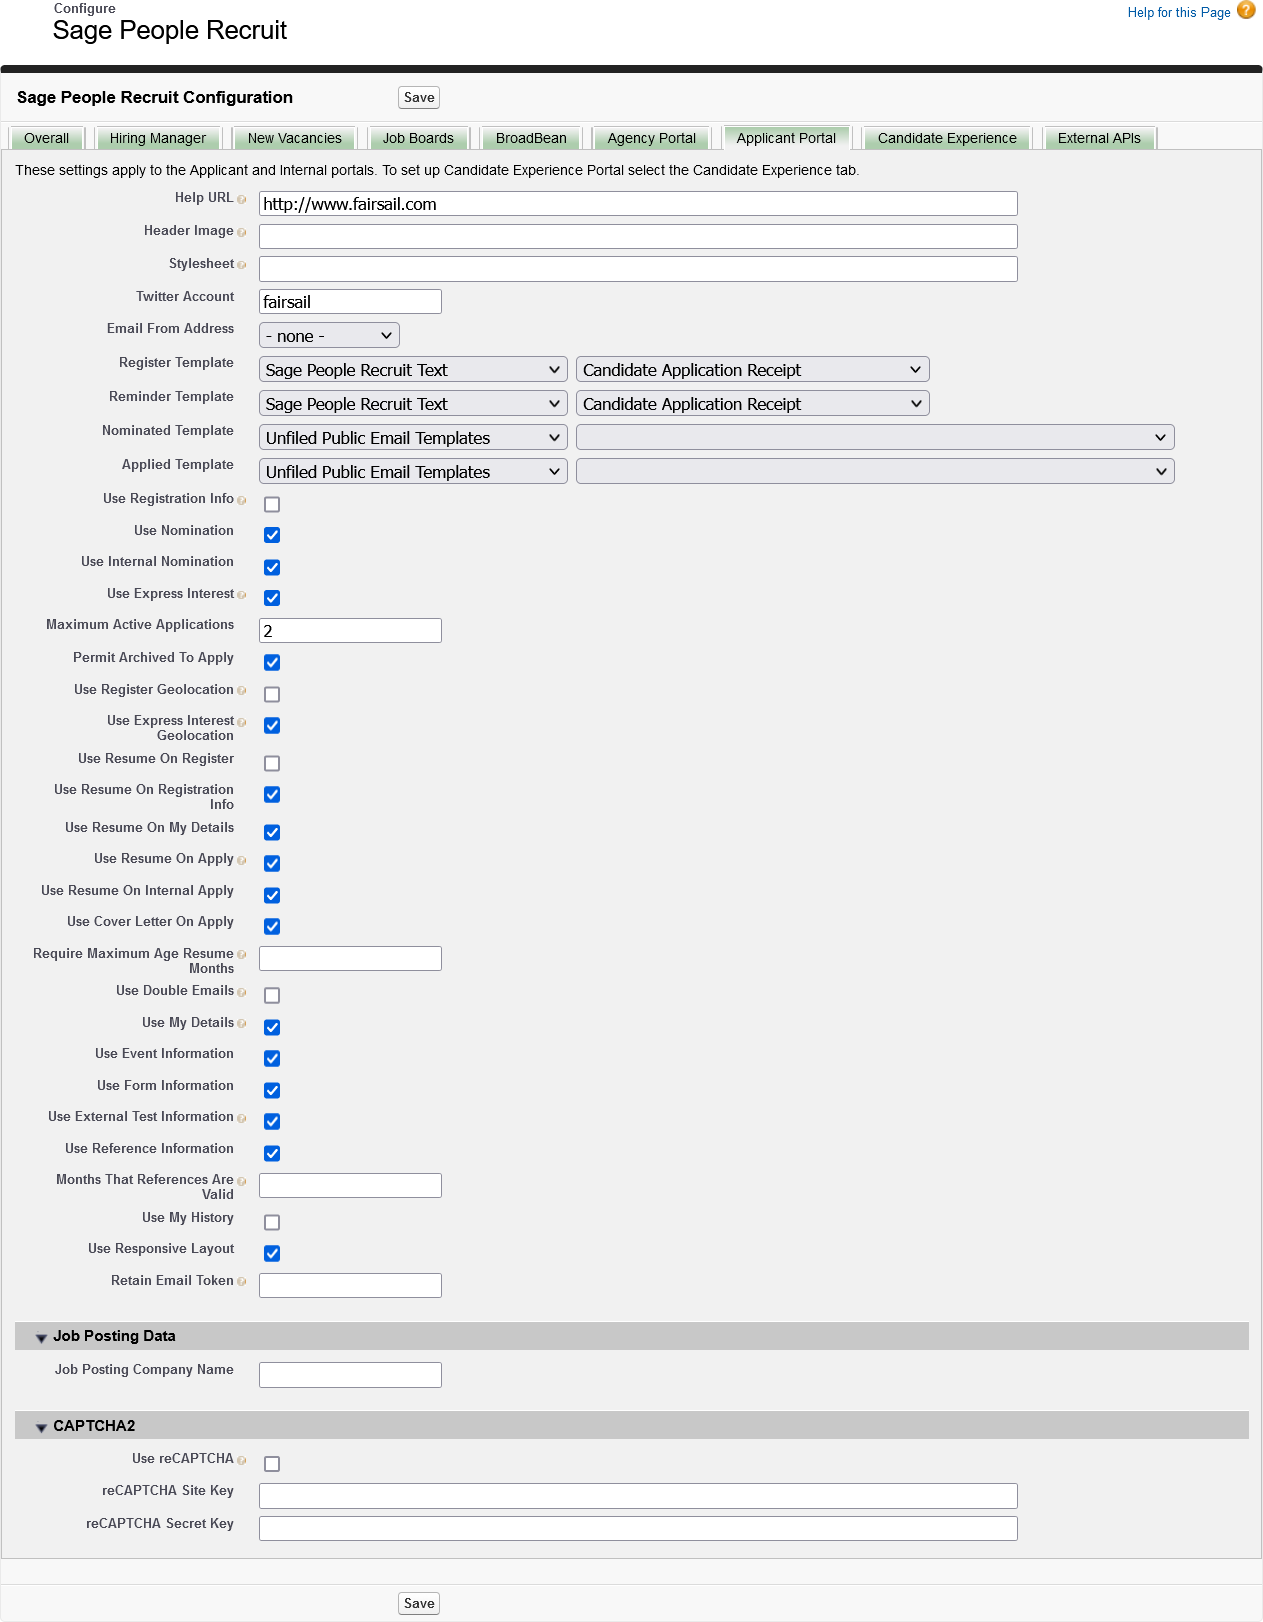
Select the Applicant Portal tab:
-
Complete the fields as follows:
Field
What to enter
Help URL
A valid web address providing help pages for your applicants. A link to pages on your own website.
Header Image
A link to the header Image in the banner of all pages in the Candidate Portal. You can:
- Upload the Image to Static Resources in your org,
- Host the Image elsewhere. Ensure that access is through https SSL.
If you are using the default stylesheet the Image is best if 1000 pixels wide.
Stylesheet
A link to a css stylesheet to be used as a default for all pages in the Portal. You can supplement this css with a dedicated stylesheet for each Candidate Portal.
You can:
-
In the list of Static Resources, select the stylesheet Name.
-
On the Static Resource Detail page, select View File.
-
Copy the stylesheet URL displayed in your browser address bar and paste the URL into Stylesheet.
-
Host the stylesheet elsewhere. Ensure that access is through https SSL.
Upload the stylesheet to Static Resources in your org,
When uploaded:
Sage People supplies a template css to use a basis for further customization.
Twitter Account
The name of your Twitter account. Used when posting vacancies to Twitter. Sage People uses the form:
@xxxxxxx
Enter the xxxxxxx character string here.
Email From Address
The sending email address used by the Portal. Set up as an organization wide email address.
To configure an organization wide email address go to Setup and in Quick Find enter Organization-Wide Addresses.
Register Template
The email template used by the Portal to send an email to someone first registering for the Portal. Use the picklists to select an existing template.
The Register Template is based on the Candidate object. To create and modify a Register Template go to Setup > Administration Setup > Communication Templates > Email Templates
Reminder Template
The email template used by the Portal to send an email to someone asking for a reminder of their candidate reference. Use the picklists to select an existing template.
The Reminder Template is based on the Candidate object. To create and modify a Reminder Template go to Setup > Administration Setup > Communication Templates > Email Templates
Nominated Template
The email template used by the Portal to send an email to someone who is nominated by another person through the Candidate Portal. Use the picklists to select an existing template.
The Nominated Template is based on the Candidate object. The Nomination object is accessible as the Current Nomination in the Candidate object, so your Nominated Template can combine data from nomination and candidate objects.
To create and modify a Nominated Template go to Setup > Administration Setup > Communication Templates > Email Templates
Applied Template
The email template used by the Portal to send an email to someone applying for a vacancy. Use the picklists to select an existing template.
The Applied Template is based on the Candidate object. The Application object is accessible as the Current Application in the Candidate object, so your Applied Template can combine data from applications and candidate objects.
To create and modify an Applied Template go to Setup > Administration Setup > Communication Templates > Email Templates
Use Registration Info
Checkbox. Check to ask new candidates for additional information after registering. Candidates you have pre-registered by entering them as candidates are also asked for this information when they first visit the site.
Use Nomination
Checkbox. Check to show the Nomination button and page on the Portal.
Use Internal Nomination
Checkbox. Not used.
Use Express Interest
Checkbox. Check to enable candidates to enter the details of the vacancies they are seeking.
Entered details are stored on the Candidate record for use by the recruiter. They are not used to automatically filter vacancies of potential interest to the candidate.
To use this feature ensure the Guest User profile or a Permission Set assigned to the Guest User has access to the VisualForce page fRecruit__ApplyExpresslnterest
Maximum Active Applications
Number. Restricts the number of applications that a candidate can have active at any one time. For example:
-
Maximum Active Applications set to 1
A candidate cannot apply for a second vacancy until the first application has ended.
Permit Archived To Apply
Checkbox. Check to enable candidates who have been rejected for a vacancy and set to Archived status to apply for another vacancy.
Use Register Geolocation
Checkbox. Check to enable automatic candidate location based on their address.
Use Express Interest Geolocation
Not used.
Use Resume On Register
Checkbox. Check to invite the candidate to attach a resume to their registration.
Use Resume On Registration Info
Checkbox. Check to invite the candidate to attach a resume to their additional registration information.
Use Resume On My Details
Checkbox. Check to invite the candidate to attach, or change, their resume in the My Details section of the portal.
Use Resume On Apply
Checkbox. Check to invite the candidate to attach their resume to their application.
Use Resume On Internal Apply
Checkbox. Check to invite internal candidates to attach their resumes to their applications.
Use Cover Letter On Apply
Checkbox. Check to invite the candidate to attach a separate cover letter to their applications. Cover letters are made accessible in the Notes related list on the Application record.
Require Maximum Age Resume Months
Number of months. If the age of a saved candidate resume exceeds the specified number of months, or there is no saved resume, require the candidate to submit a resume with their application.
If blank, no resume is requested.
Use Double Emails
Checkbox. Check to request the candidate to enter their email address twice for registration and nomination. Both must match to be accepted.
Use My Details
Checkbox. If checked, display the My Details section of the portal.
Use Event Information
Checkbox. Check to show event details and permit event booking on the My Application page.
Use Form Information
Checkbox. Check to show forms that are to be completed on the My Application page.
Use External Test Information
Checkbox. Check to use external tests in the My Application page.
Use Reference Information
Checkbox. Check to show the references that have been sent but not yet received on the My Application page.
Months That References Are Valid
Number of months. If the age of saved references exceeds the specified number of months, repeat references are requested.
If blank, references are valid indefinitely.
Use My History
Checkbox. If checked, display the My History section of the portal.
Use Responsive Layout
Checkbox. If checked, adapt the Candidate Portal display to the screen size of the device used to view it.
Retain Email Token
Text, up to 40 characters. The message to display on Candidate emails you want to store on the Candidate record, for example:
This email is stored on your record.
Retain Email Token acts as a trigger to create candidate email records for emails based on email templates containing this merge field referencing the Token:
You must also setup an email service and enable the Salesforce Compliance BCC Email service to support the retention of copies of candidate emails.
With Retain Email Token populated and a correctly configured email service, emails sent to the candidate from your org generated from email templates not containing the merge field are filtered out and not stored on the Candidate record.
The merge field must be present in the plain text version of the email template to store the email on the Candidate record.
If you leave Retain Email Token blank, no candidate email records are created for any emails and email filtering is not used.
Job Posting Data section
Field
What to enter
Job Posting Company Name
Text, up to 255 characters. Enter the Company Name to display in structured Vacancy data for Job Board crawlers.
-
Complete the CAPTCHA2 fields to add Google reCAPTCHA2 protection to your Candidate Portal.
-
Select Save.
External APIs
Sage People enables controlled access to external services such as resume parsing through APIs (Application Programming Interfaces). The external services can then be used to supply data directly to the Sage People system without the need for re-keying.
When installing Sage People Recruit you are asked to approve access for third party websites:

-
Select Yes, grant access to these third-party web sites.
Granting permission enables you to set up access to:
- DocuSign, to enable e-signature for recruitment forms.
- Sovren, to enable the Resume Parsing service.
- Select Continue.
- Complete the installation process.
When Recruit is installed, to configure External APIs:
-
Go to Setup and in Quick Find enter Installed Packages.
-
Find Recruit in your list of installed packages and select Configure in the Action column.
- Select the External APIs tab:
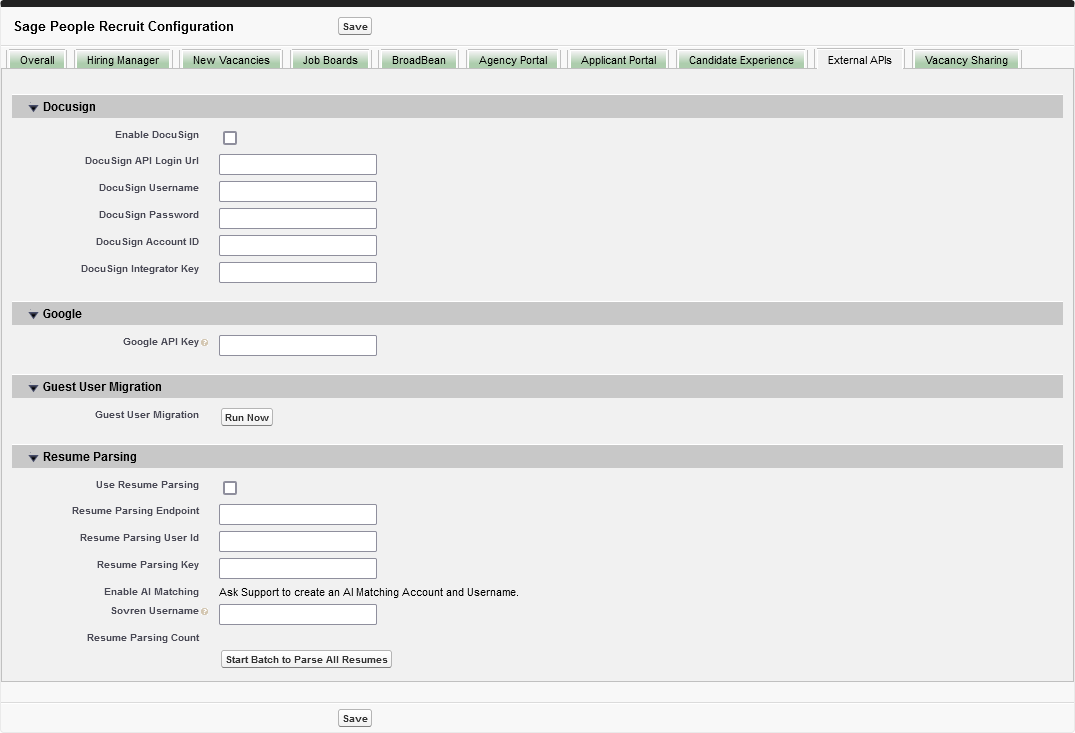
-
Complete the fields as follows:
Field
What to enter
Docusign section Enable DocuSign
Checkbox. Check to enable DocuSign for use with Recruit emailed PDF offer letters.
You must have an active DocuSign account configured for use with Sage People Recruit.
DocuSign API Login Url
The url for the DocuSign REST API, supplied by DocuSign, of the form:
https://{server}/restapi/{apiVersion}/login_information
DocuSign Username
The Username for your DocuSign account. Either the email address of the person authorized to use the DocuSign API, or a DocuSign supplied GUID for the email address. Available from your DocuSign Preferences page.
You must also complete DocuSign Password and DocuSign Integrator Key before attempting to use DocuSign through Recruit.
DocuSign Password
The password for DocuSign Username,
You must also complete DocuSign Username and DocuSign Integrator Key before attempting to use DocuSign through Recruit.
DocuSign Account ID
The unique 32 character GUID associated with your DocuSign account. Supplied by DocuSign.
DocuSign Integrator Key
A unique identifier supplied by DocuSign and used to gain secure access to the DocuSign service by Sage People Recruit. Recorded on your DocuSign Preferences page, from where you can also request an Integrator key for Sage People if you do not have one.
You must also complete DocuSign Username and DocuSign Password before attempting to use DocuSign through Recruit.
Google section Google API Key
An API Key for Google Maps from Google to enable Vacancies to show a map of the job location, based on the Location Postal Code field.
If blank, a map cannot be displayed. If you edit the Vacancy, you see a message in the Map field explaining why a map is not displayed.
Guest User Migration section Guest User Migration Run Now button. Runs a batch to convert record ownership from Guest User to a defined record owner. The batch runs automatically when Recruit is upgraded from any version older than 31.1.2, and under normal circumstances Run Now does not need to be selected. Resume Parsing section Use Resume Parsing
Checkbox. Check to enable the Resume Parsing service and the AI Matching service. There is typically a charge for this service.
Resume Parsing Endpoint
The url for the Resume Parsing service used by your organization. The endpoint depends on your location; the US and Europe have different endpoints. Supplied for you by Sage People. Resume Parsing User Id
The unique user identifier for your org used by the Resume Parsing service. Supplied for you by Sage People. Resume Parsing Key
The service key created by the service provider to enable access to the Resume Parsing service. Supplied for you by Sage People Enable AI Matching The status of the AI Matching service for your org. The service must be enabled for you by Sage People.
Displays Ask Support to create an AI Matching Account and Username until AI Matching is enabled.
When AI Matching is enabled displays Enabled.
Sovren Username Supplied for you by Sage People Resume Parsing Count
Number. The number of resumes parsed by this org during the current 12 month contract period.
The number of resumes permitted (typically 1000, subject to fair use) and any associated charges are defined in your Sage People contract. Resume Parsing Count is not editable.
-
Select Save.
If you have successfully configured options to enable AI Matching, a batch is triggered to parse all resumes added to your org in the last 18 months. Parsing processes the resumes for use by AI Matching.
-
If you have added values or made changes to fields in the Resume Parsing section, select Save before selecting Start Batch to Parse All Resumes. You cannot successfully parse resumes until required fields have been saved with valid values.
Start Batch to Parse All Resumes
Button.
Select to process all unparsed resumes held in your org except:
- Resumes held for Candidates who are Archived.
- Newly received resumes for Candidates with existing, parsed resumes.
Check the number of resumes likely to be processed before selecting so that you do not exceed the number permitted by your contract with Sage People.
Vacancy Sharing
The Vacancy Sharing tab is only accessible for users assigned to the Recruit Administrator profile or a custom equivalent, or to the System Administrator profile. Settings are relevant if your organization uses public groups to control access to vacancy records.